
Renovating your bathroom is about more than just updating the look of your space. By bringing the visual appeal of your home up to modern standards, you’re also making your environment a happier place to live in and improving the overall value of your property.
But if you’re worried about the cost of taking on such a big project, don’t worry. There are certain shortcuts you can take to help save money along the way. In fact, one of the most common methods is to paint your existing sink.
If your existing sink is in good condition, a few coats of paint are more than enough to make it look much more modern. In fact, there are numerous products on the market just designed for rehabilitating old bathroom fixtures.
Learning how to paint a bathroom sink isn’t difficult, but it does take a bit of knowledge to ensure it comes out right. Here’s what you need to get started.
Deciding to Paint a Bathroom Sink
Before you dive right in, you’ll want to decide if your bathroom sink is actually worth painting. In most cases, this means looking at the current condition and deciding if the materials themselves are still durable enough to make it through the process and wear for a few more years.
If your sink is chipped, cracked, or otherwise has major damage, it might be a better idea to go ahead and just replace it versus painting it. However, most sinks are rated to last decades, which means there’s a good chance yours just needs a visual makeover and not a total replacement.
Prior to starting your project, it is also important to decide if you’re just painting the sink or any adjoining countertop, too. Many older models come as one solid unit, such as many marble and acrylic varieties, which means you’ll want to keep this in mind as you move forward.
Gathering Materials for Painting a Bathroom Sink
Now that you’ve decided to paint your bathroom sink, it is time to gather materials. You should be able to purchase them at your local hardware or home improvement store with no issue. You can also purchase them online and have them shipped to your door for added convenience.
The materials needed for painting a bathroom sink include:
- Bleach
- Softscrub Cleanser
- Scrub Brush
- Sponges
- Plastic Drop Cloths
- Painter’s Tape
- Protective Eyewear
- Face Mask
- Scraping Knife or Razor Blade
- Wet/Dry Sandpaper - 400 Grit
- Soft Cloth
- Rustoleum Specialty Tub and Tile Spray Paint
The overall cost for gathering these items can greatly depend on the area of the country you live in. However, you should be able to get everything you need for under $100, including specialty sink paint. Considering the alternative of replacing an entire sink, this is a pretty good bargain.
What to Do Before Painting a Bathroom Sink
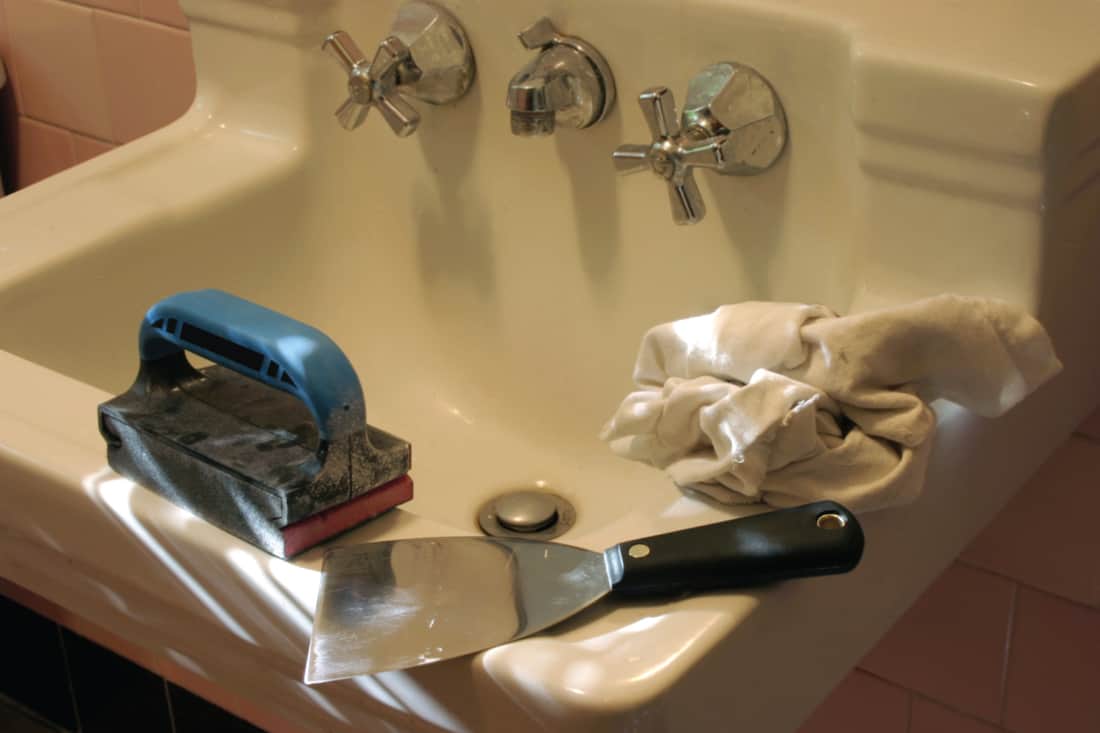
Before painting your bathroom sink, there is a bit of preparation work that you need to do. First, it is important to remove any sink fixtures or faucets and set them aside. Then use a metal scraping knife or a razor blade to get rid of any excess caulking, which is important if you want a smooth finish when you’re done painting.
Next, cover the area around the bathroom appropriately with plastic drop cloths and painter’s tape. You’ll eventually be using spray paint in this tiny space, which can easily get everywhere if you aren’t thorough in ensuring the areas you don’t want painted are covered. If you have an exhaust fan, make sure this is turned on and working, as well.
Finally, put on your protective eyewear and face mask and get started on the next step, which is surface preparation.
The Bathroom Sink Surface Preparation Process
Preparing your bathroom sink surface for paint is the next crucial step. Use a mixture of bleach and hot water to help eliminate any mildew, even if you can’t see it with the naked eye. Rinse thoroughly.
Then comes the scrubbing process. Use an abrasive cleaner like Softscrub and a scrub brush to help lift any hidden dirt or debris hiding in the pores of the sink. Again, you might think the surface is clean, but it is really important to ensure you’re getting it as sterilized as possible.
And the last step in surface prep is to start sanding the sink with a wet/dry rated sandpaper. Take your time and make sure to scuff up as much of the smooth surface of the sink as possible. In the end, this will determine how well the paint adheres, so be sure to not rush this process. Wipe away any dust or debris with a soft cloth.
Painting a Bathroom Sink
Now that your sink surface is ready, it is time to get to the fun part, paint! At this time, Rustoleum Tub and Tile Spray Paint only comes in a bright white hue, but that is generally sufficient for most homeowners looking to upgrade the look of their space.
This paint does have some pretty strong fumes, so make sure you’re wearing eye protection and a face mask during the process. If you have the ability to open a window or bring in a fan, it is a good idea to do so.
Start by spraying the surface in light coats, four to five inches away from the sink. Go in even layers until you’ve covered the entire exterior of the sink and inside the bowl. Don’t worry if it looks a little thin, as subsequent coats will help improve this. Wait at least an hour between coats, adding three to five until you’ve reached a desired sink color.
Wrapping Up Painting a Bathroom Sink
After waiting two to three days to allow the coating to cure, remove all of the plastic drop cloths and painter’s tape. Reseal any edges that previously had caulking, making sure to use a bright white color rated for use in wet environments, such as a bathroom.
Reinstall your fixtures carefully. If you’re putting a new one in, this can be a great time to really see your project come together to the finished phase. However, don’t be tempted to throw out those old knobs just yet. Rustoleum also makes spray paint that can give you a beautiful black or antiqued metal look, which might be sufficient to spruce up your old one with minimal cost.
Take special care not to scratch the new sink coating, which will still be a little delicate for a period of time after painting. Test your sink and drains to ensure they work. Once everything is back in place, you can continue to use your bathroom sink just like before.
Care and Maintenance of a Painted Bathroom Sink
We sometimes add affiliate links and content that was curated and created by our team with the help of advanced ai tools to help showcase the best design styles.
As you start to regularly use your new bathroom sink, just remember that the surface might not be as durable as you might expect from a professionally painted one. While you were able to save money by doing this yourself, you do give up a little bit of quality in the end.
When cleaning your bathroom sink, don’t use any harsh scrub brushes or steel pads. This can cause the paint to flake off, making it necessary to paint it again in the future. Also, try not to drop anything super heavy in the sink bowl, such as a hairdryer or anything else bulky. This can cause scratching, flaking, or cracking.
Other Tips to Remember About Painting a Bathroom Sink
Still a little unsure of whether this process will work for you? Here are a few other tips to remember about painting a bathroom sink:
- Remember that the existing sink you’re painting might require additional coats if the original color is bright or bold, such as a black or a groovy sixties-style pink.
- Paint chipping or a bumpy surface are easily fixed with a little wet/dry sandpaper and a couple more coats of the specialized spray paint.
- This is in no way a total replacement for fixing a sink that is broken or damaged.
- When in doubt, keep adding coats until you get the final surface that you desire.
- Small chips and scratches can be fixed using a paint on version of the same Rustoleum paint.
By keeping these ideas in mind, you’ll rest assured that painting your bathroom sink will be as easy and affordable as you hope it will be.
Wrap Up: How to Paint a Bathroom Sink
If you’re wondering how to paint a bathroom sink, this guide is a great place to start. Rustoleum Tub and Tile Spray Paint makes the process simple and effective, meaning just about any level of DIYer can achieve great results.
Painting a bathroom sink is a process that can save you a ton of money when renovating your home. While there are certainly a few steps that you need to take and it does require quite a bit of work, it is possible to have a beautiful sink that you enjoy without breaking your budget.